Website SEO Migration Workflow & Checklist - 2025 Edition
Introduction
Website migrations happen everyday, and the difference between a good migration and a bad migration can be life-changing - at least for your site and business.
A bad migration can kill your site, destroy years of hard work and make clients very unhappy. See the below image for traffic drop after a bad migration.
We don't want that, so lets see how to make a migration go smoothly.
Have a migration and want to understand it's complexity? Scan the site now →
Need to generate 1000s of redirects in seconds? Try Rapid301 now →

Before we dive into workflows, what exactly is a migration? What do we need to consider. And how we can ensure it goes as smoothly as possible?
In this article, we will answer these questions and more. But first, here's the TLDR:
- Website Migrations involve mapping old site structure/content to a new site structure/content.
- They are required whenever you do a site rebuild or change CMS.
- You must rebuild key pages that have lots of backlinks and page authority.
- Ensure you keep keywords on the pages if they are ranking for those keywords.
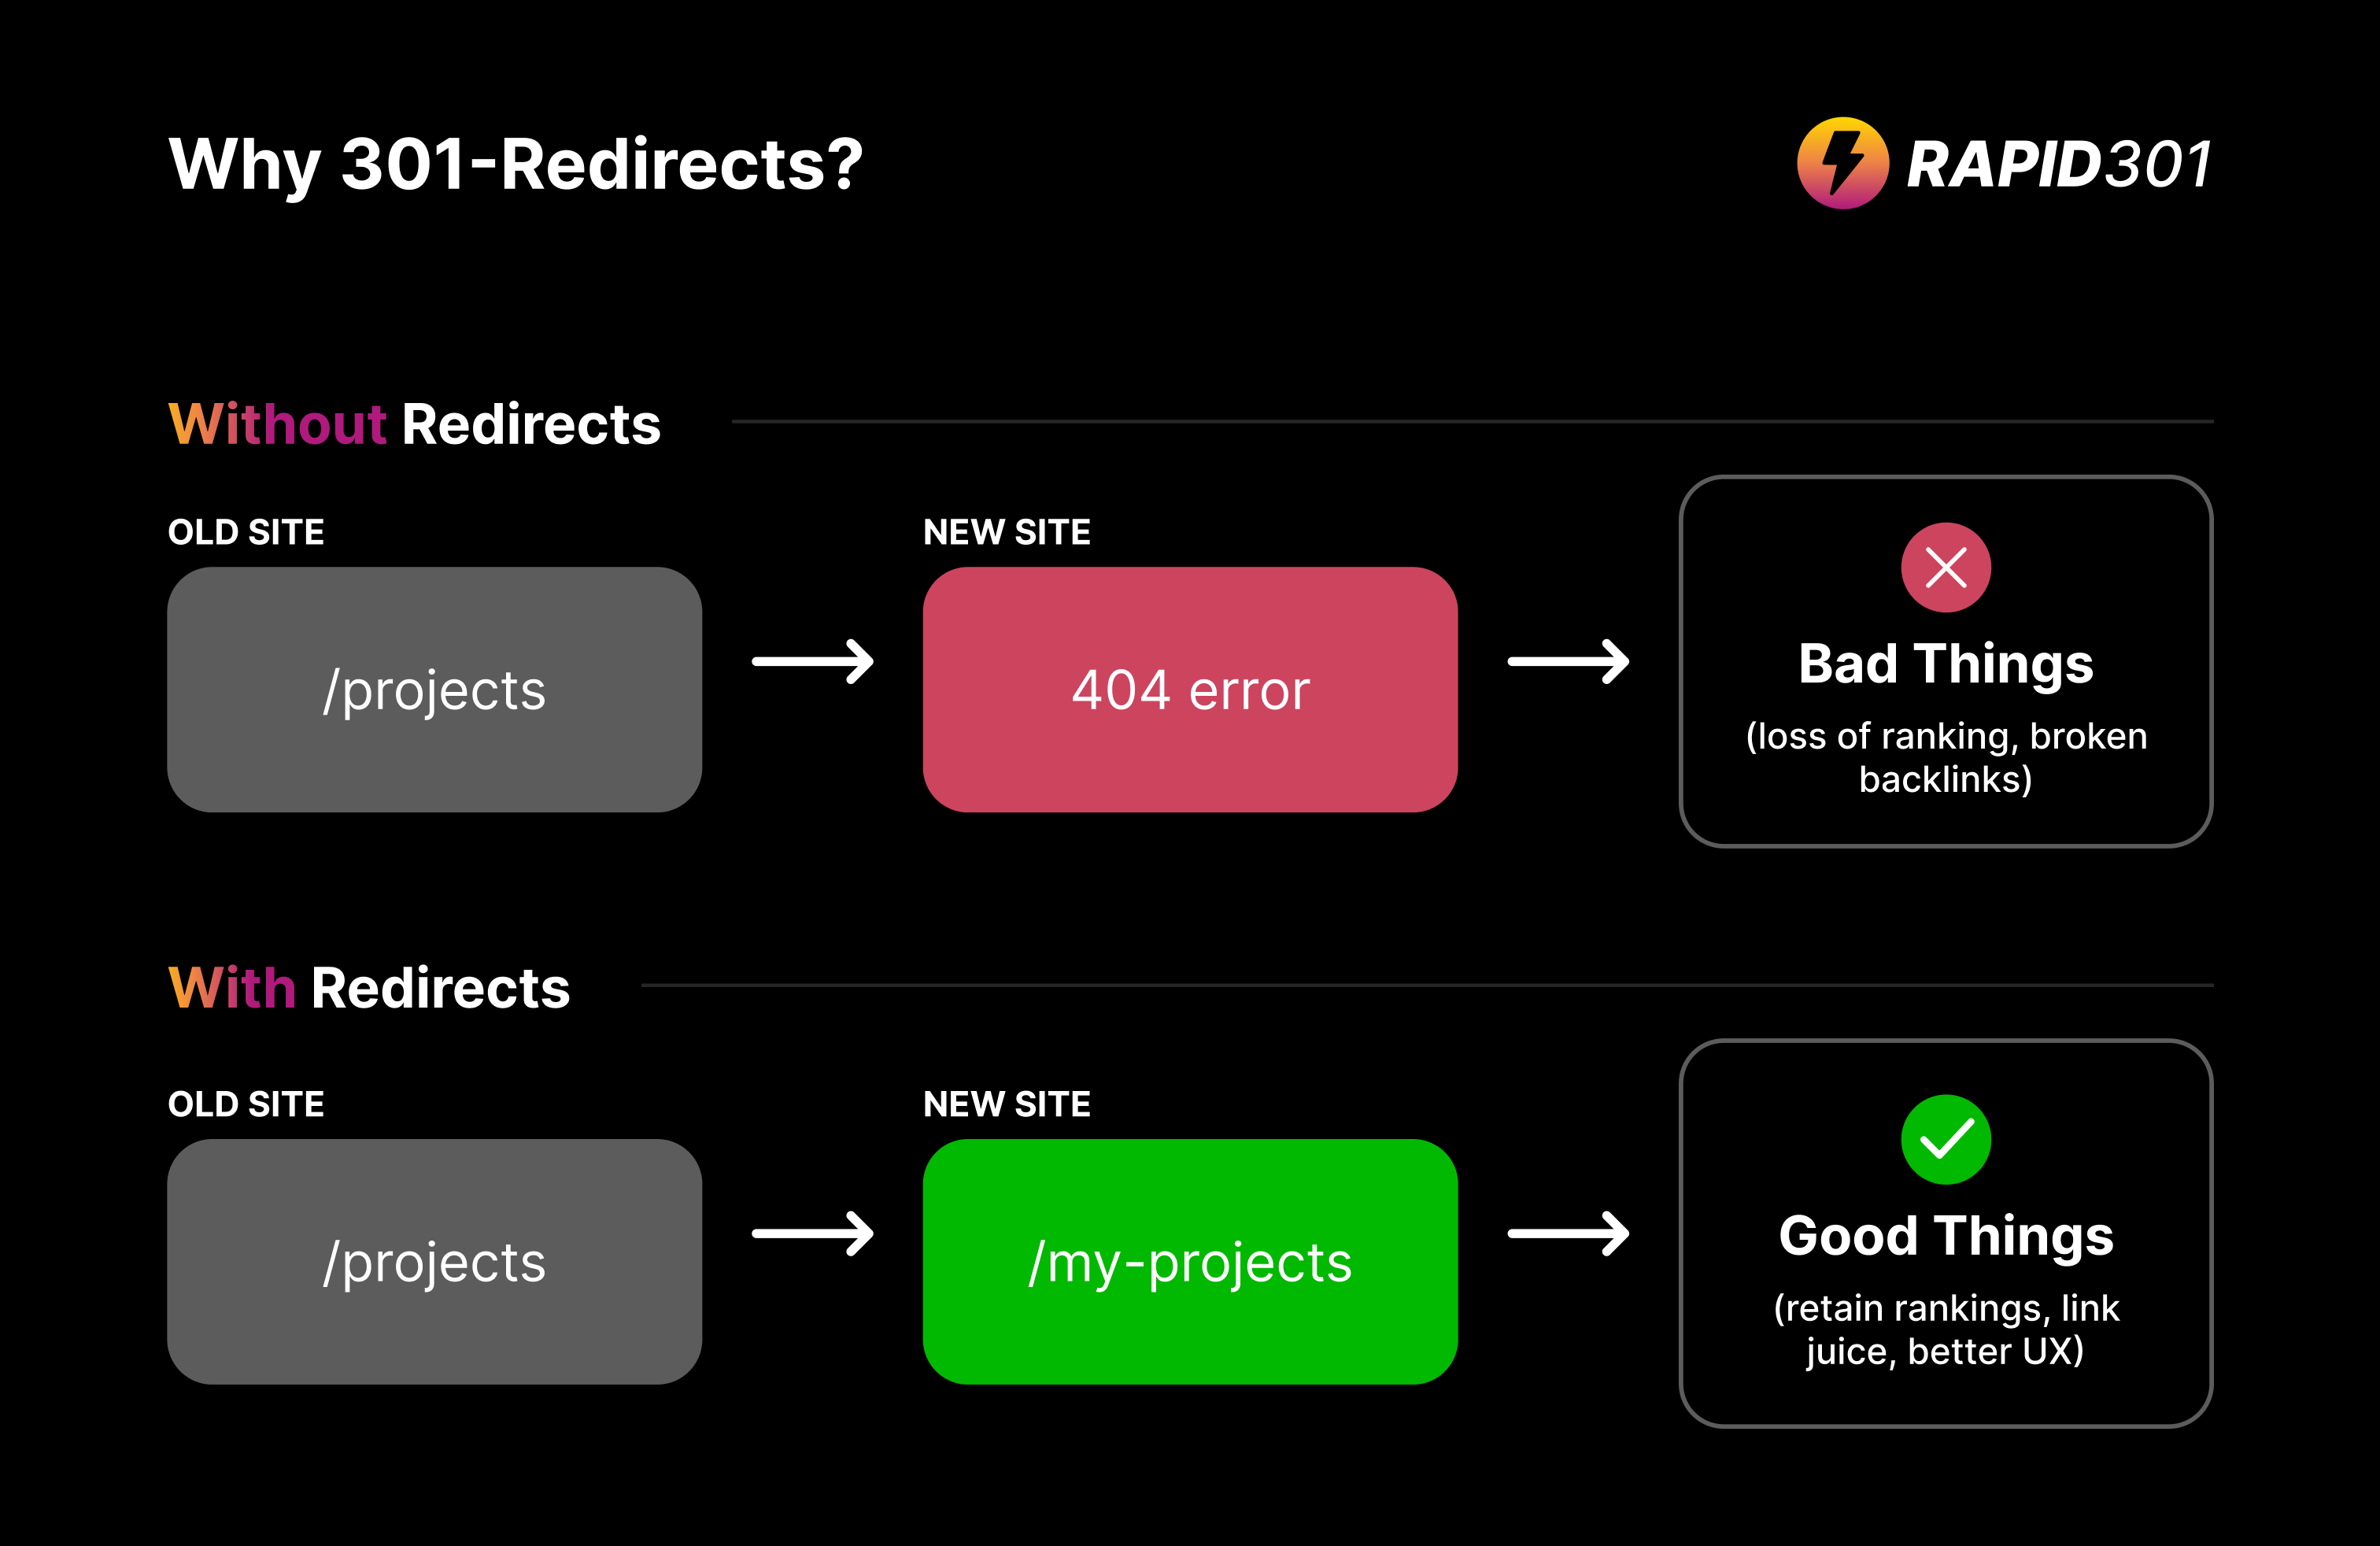
- Keep the URL structure of the site the same if possible.
- If you have to change URL structure, setup a 301-redirect.
- After you publish the new site, add the sitemap to Google Search Console.
- Monitor the project in Google Search Console to ensure the migration has been effective.
This guide assumes you are rebuilding a site and keeping the domain the same. If you are changing the domain, or migrating multiple sites into one, you can follow the same process and add the domain to the redirects after. More on that later.
What is a website migration?
When you rebuild a website, a lot of structural changes are made to the sitemap, page structure, content.
The rebuild process often creates large discrepancy between your old site and new site. The process of mapping the old structure/content to the new structure/content is called a migration.
A methodical migration process is crucial because your old links driving all the traffic to your site. They are the links that are ranking, have been shared on socials or have traffic from affiliates.
Changes you make during the rebuild process have a huge effect this, and we need to tell search engines about the updates. Our goal is to keep traffic flowing.
Steps In A Migration
Every migration follows a similar process and the best migrations are always considered BEFORE starting the redesign / rebuild process. Lets break it down into phases, with steps in each phase.
1. Before Project Kickoff - Quoting Phase
The best practice for any site rebuild is to run an analysis on the current site during the quoting phase.
This enables you to identify how many pages you will need to rebuild, how much content that needs to be migrated across, time needed to 301-redirects etc. This information is useful so you can quote for it.
Here are the steps to take before sending a quote:
- Analyse the current site to find key pages / ranking keywords - use SEO tools like Rapid301's Website Migration Analyser, Screaming Frog, Analytics Tools, Google Search Console etc.
- Create a list of pages with lots of backlinks that are ranking well - these absolutely must be rebuilt and included in the new sitemap.
- Find out CMS driven pages (blogs, projects etc) there are and which ones need to be brought across to keep backlinks and rankings.
- Identify which pages are not relevant or can be cut, these will need to be redirected.
The key thing you need to know at this point is the new sitemap structure and the amount of CMS pages that need to be migrated across. Factor this into your quote!
2. After Project Kickoff - Redesign Phase
With the sitemap in hand and the keywords identified, it's time to design. This step is simple.
- Ensure all pages that are currently ranking or have backlinks are included in the redesign.
- Make sure the new design enables you to fit all the key content - remember, keywords matter!
TIP: Pages that are ranking because of lots of keywords should be made to look better. But don't cut out all the keywords to make the page pretty, or you will start to lose rankings.
3. After Design Approval - The Build / Content Migration Phase
Now is the time to lay the foundation of new site structure. Think of it like a tree. This step is the same for any web builder or CMS; Webflow, Framer, Wix, Wordpress, custom. Go ahead and create the pages.
At this point, consider the new URL / path structure. You have one of two choices.
- Keep the URL structure the same - no redirects are needed.
- Change the URL structure and setup a 301-redirect for the page.
Changed the URL structure on your site? Create 301-redirects now →
The 301-redirect will automatically send people to the most relevant page on the new site. Use 301 redirects when you do not build a new page or you change the URL. For a full explanation on URL structure and migration strategies, see this article.
Best practice is to keep the URL structure the same as this requires less steps and reduces complications. If you change it, keep it as similar to the old URL as possible.
With the above strategies in mind, it's time to move all the content across.
- Create CMS collections and populate with quality content.
- Ensure meta information is added; titles, descriptions, OG images
With all the pages created and content migrated across, it's time to publish the staging site and get it tested. Send it to the client for review.

4. Check, Check & Check - The Pre-launch Phase
Congratulations, the bulk of the work is done you've made it to the pre-launch phase!
Your old site is still live and your staging site has all the pages built and content has been migrated across. Now it's time to prepare the last few things, namely create the 301-redirects.
Here are the rules for 301-redirects:
- Pages that have URLs that were on the existing site DO NOT NEED to be redirected.
- Pages where the URL structure has changed NEED TO BE redirected.
- Pages that were present on the old site but not present on the new site NEED TO BE REDIRECTED to the most relevant page or directory.
Here's how to map 301-redirects:
- Get the sitemaps of the OLD site and the NEW site (you can use SEO tools like Screaming Frog or Rapid301)
- Find the most relevant URL on the NEW site to the corresponding URL on the OLD site.
- Add the OLD URL and NEW URL to the .csv or .htaccess file (depending on your server setup)

You can manually match these up, but that takes hours and is boring work. Here's the fast and less boring way to map 301-redirects en-mass.
If you have already have sitemaps from Screaming Frog, upload them and have them automatically best matched with this Sitemap to 301-Redirect's tool. This tool also removes duplicates.
If you have only the current site URL and staging site URL and no ability to get the sitemaps, you can simply enter them into URLs to 301-Redirects tool and get the 301-redirects output from that.

5. Go Live And Monitor - Launch Phase
Once you have the redirect document, here's what you need to do before going live.
- Add the 301-redirects to the server - either as a .csv or as part of a .htaccess file.
- Swap the domain over to the new site.
- Check the status codes of all the websites within your Rapid301 project.
- Ensure your site has a robots.txt file and generate a sitemap (this makes it easy for search engines to crawl your site)
- Add the new sitemap to Google Search Console.
- Monitor over the next 72 hours to ensure the migration went smoothly, do any little spot fixes.
Conclusion
SEO Site Migrations can be a lot of work, but they are crucial part in preserving search rankings and traffic flow when rebuilding a website.
Let's do a quick recap of the high level points that were covered:
By analysing the current site before quoting, you can provide a basis for your direction for your new site structure. You can also factor in the costs of migrating content across and mapping the 301-redirects.
While redesigning, ensure that your new design has enough space to fit content from pages that are ranking well. Cutting out too much content will cause you to lose the keywords and rankings.
While rebuilding, make sure that you keep URLs the same from the old to new site when possible. If you change the URLs, setup 301-redirects. Rapid301 will save you a bunch of time manually mapping any URLs that have changed.
Before swapping the domain over, add redirects to your project. After swapping the domain over, create the robots.txt file and sitemaps. Add the sitemap to Google.
Monitor the impact on traffic flow and perform spot fixes if required.
If all went well, then congratulations - the migration is complete! Now just repeat this process.