Everything you need to know about 301 Redirects In Webflow
Introduction
301 Redirects. Why are they important? When do you need them? What is the best way to set them up in Webflow? All these questions are more will be answered in this article.
There's a bit to cover, so here's the TLDR:
- Search engines index/rank pages by page content & URLs.
- Social media shares + backlinks from blogs drive traffic to specific pages/URLs.
- URL's build authority and backlinks over time. More authority + backlinks = more traffic.
- When rebuilding a site, the site structure / URLs may change.
- 301-redirects make search engines aware of changes to site / URL structure so they can keep traffic flowing.
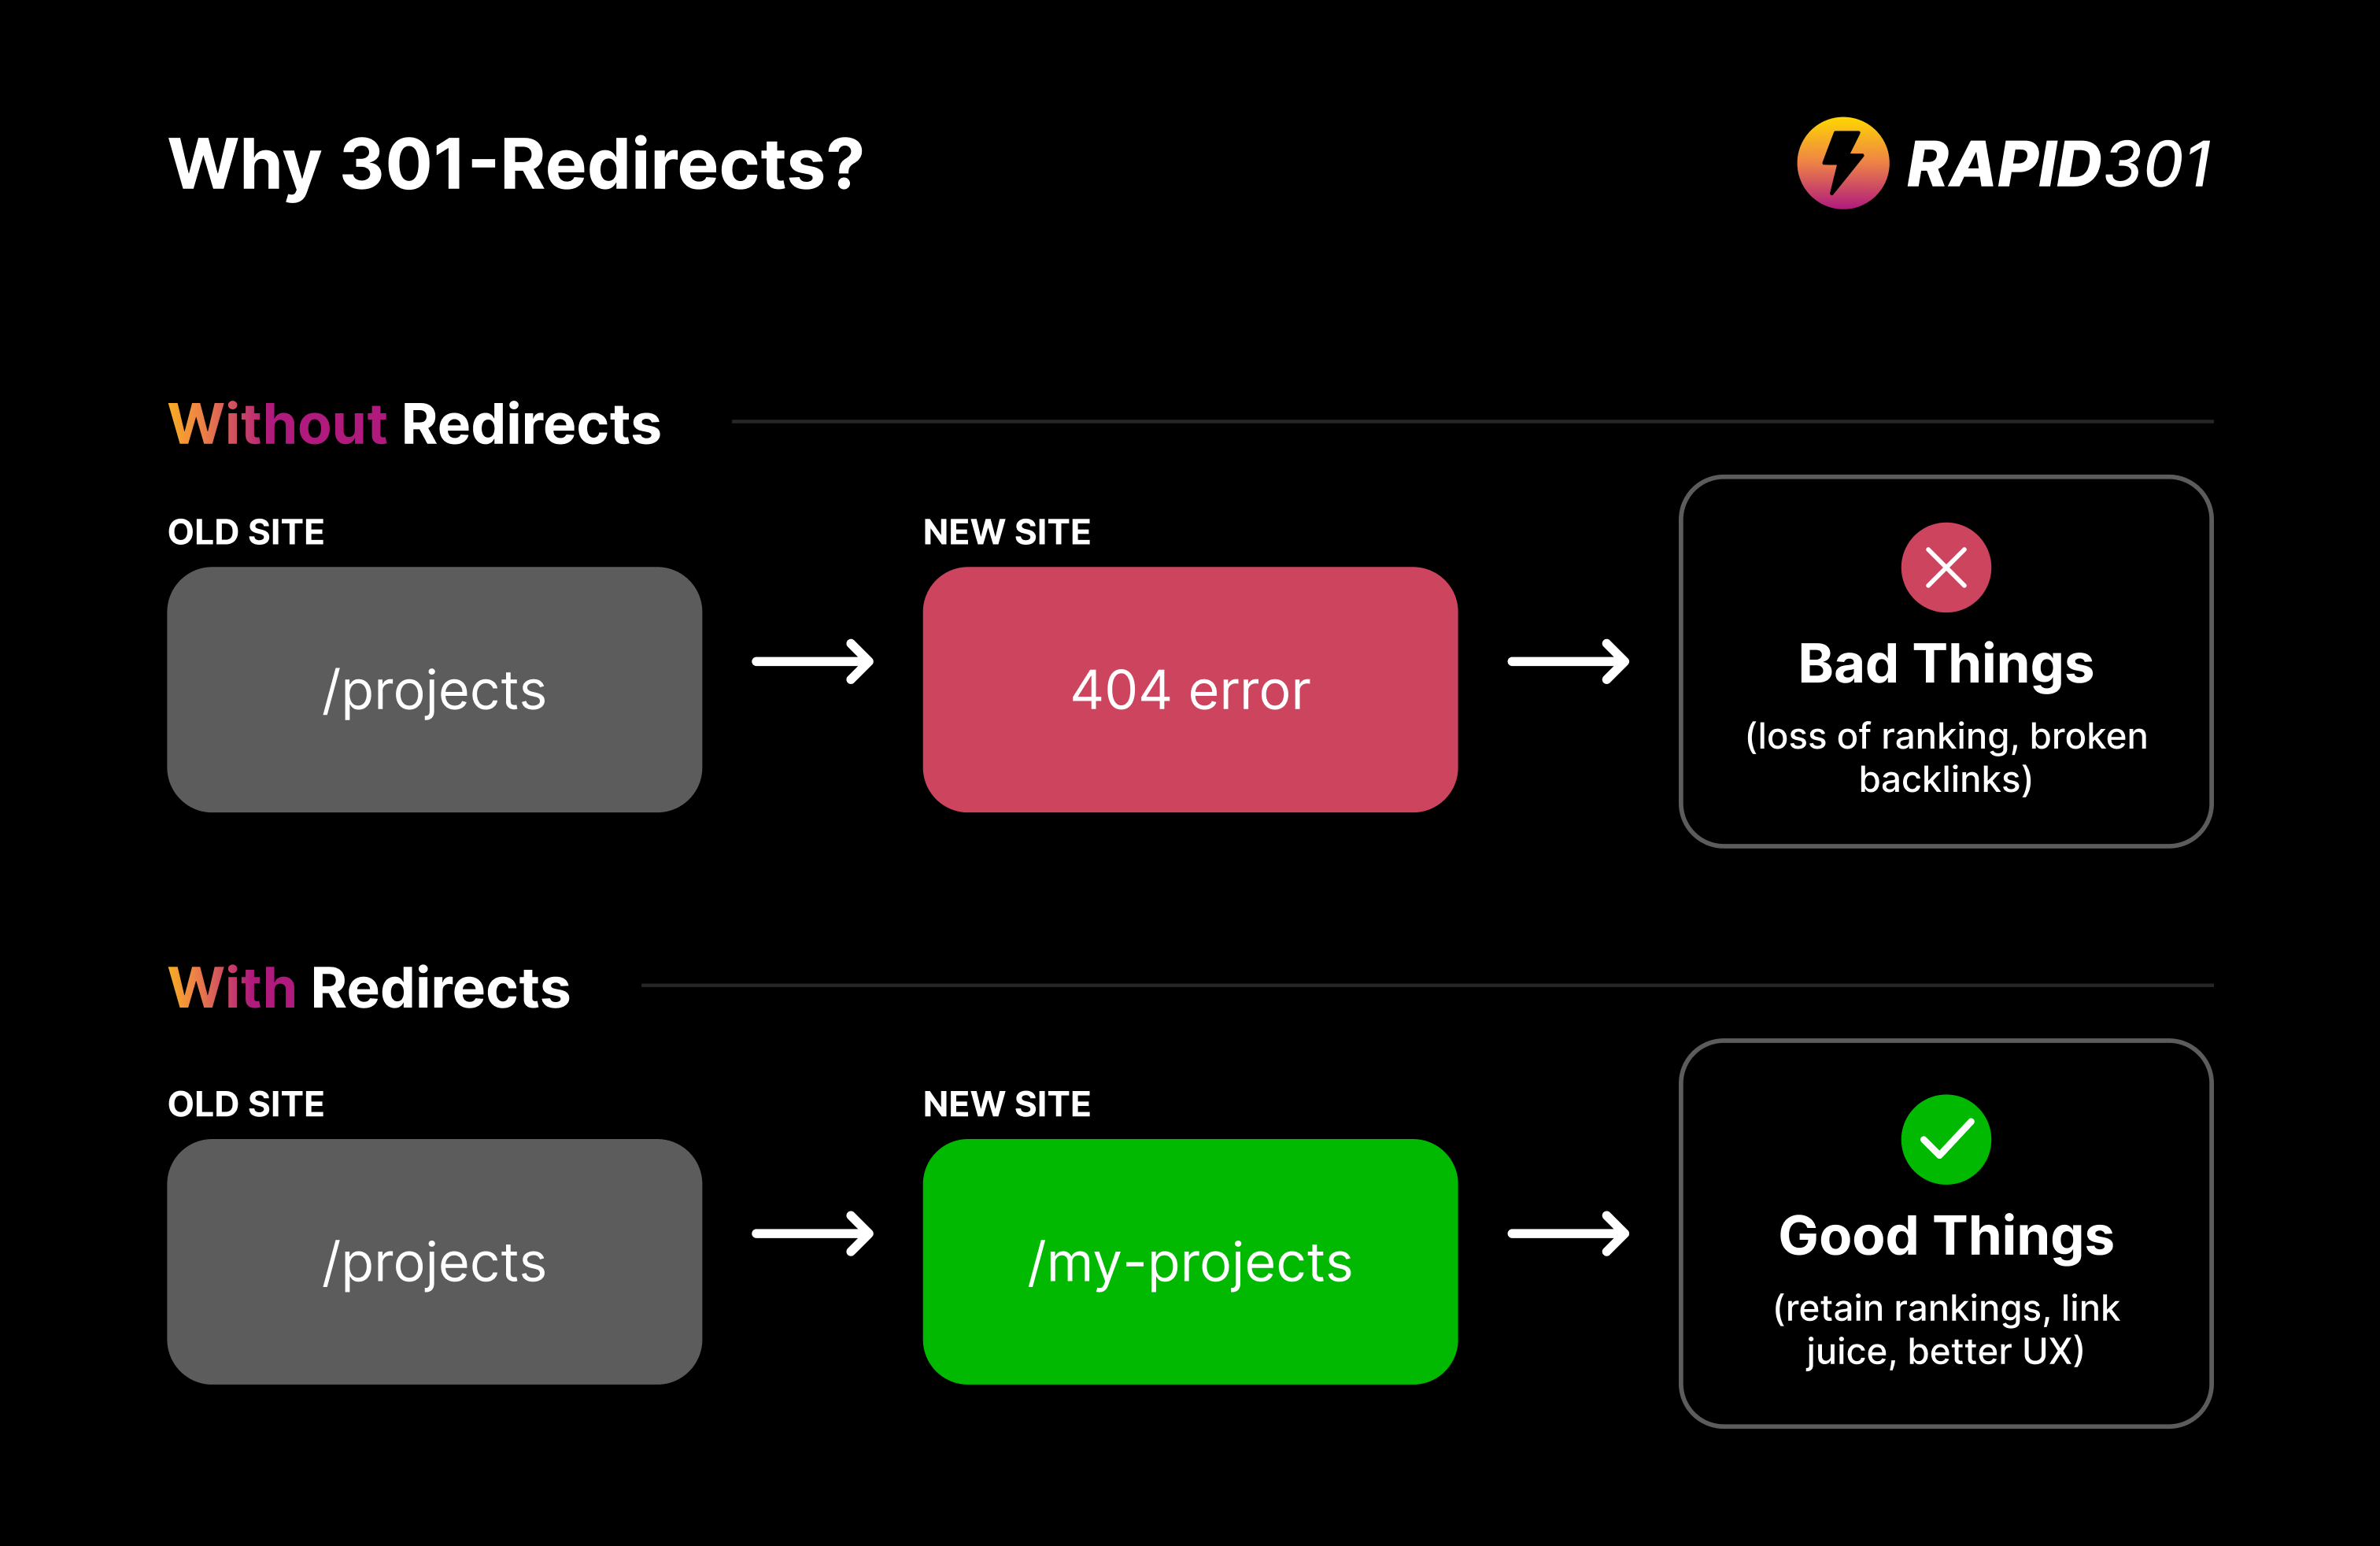
- If you do not setup 301 redirects, users that navigate to OLD URLs will end up on a 404 page -> this is very bad.
- Set up 301-redirects to ensure users end up on the most relevant page on the new site, -> this preserves page rankings, backlinks and SEO efforts.
- The more specific the redirect, the better the continuation of the user journey.
- Why Webflow? Because it's awesome.
We recommend keeping the URL structure of websites exactly the same whenever possible, because this will save you the trouble of setting up 301 redirects.
In many cases however, you can't keep the structure exactly the same. So let's dive in and see everything about 301-redirects in Webflow.

Why should I care about 301-Redirects?
Say your client has a site, example.com that has 300+ pages.
A specific article on example.com is ranking on the first page of Google. It's also been shared on social media and blogs -> the page has high page authority and lots of backlinks, driving lots of traffic.
OLD URL: example.com/blog/blog-post-driving-lots-of-traffic.
Every time a user clicks on the OLD URL from Google, or from a blog or social media backlink, the browser navigates to the OLD URL and the user is presented with the article.
But if you are rebuilding the site and do not make a page that has the same exact OLD URL, the page/article will not exist anymore - the link will be broken.
Then, when a user navigates to that URL, they will see a 404 error page instead of the content. This is very bad - just think of the lost traffic!

These users are guaranteed not to convert because they see an error. And because your site is serving users errors, search engines penalise your domain.
To prevent this, you can either;
- Keep the URL structure the same and make sure the content is migrated across - no redirects are needed.
- Change the URL structure and setup a 301-redirect for the page, that automatically redirects users to the most relevant new page, so traffic continues to flow.
To summarise, pages build up page authority and backlinks. If the URL structure changes during a rebuild and these change are not handled with 301 redirects, here's what happens;
- The browser goes to the OLD URL, which doesn't exist.
- The user lands on a 404 error page.
- The search engines notice this and penalise the page and your domain.
So prevent this, we need to have a strategy.

Strategy For Keeping Link Juice Flowing
In most rebuilds, there is often a combination of exact match pages and pages that require redirects. Here is the strategy:
- Whenever possible, keep the URL structure exactly the same.
- If you have high-ranking content and must change the URL structure, build a page with URL that is as close to the original as possible and setup a 301-redirect.
- If there is content that is outdated / does not need to be migrated, redirect it to the most relevant page or index.
Let's look at each case in a bit more detail.
Exact Match Pages (no redirect)
OLD URL: example.com/about
NEW URL: example.com/about
This is the optimal case. Because the paths are equal you do not need to setup a 301-redirect.
------
Same Content, Modified Paths (301-redirect needed)
OLD URL: example.com/blog/blog-post-driving-lots-of-traffic.
NEW URL: example.com/articles/article-driving-lots-of-traffic.
In this case, the URL has changed, blogs have been setup as Articles. Now if a user navigates to the OLD NEW once the NEW SITE has gone live, they will end up at a 404.
To prevent this, you must setup a 301-redirect that automatically sends users to the NEW URL whenever they try to access the OLD URL.
------
No Relevant Content (301-redirect needed)
OLD URL: example.com/blog/this-blog-is-not-ranking-or-relevant
NEW URL (if relevant content): example.com/most-relevant-new-page
NEW URL (if relevant sub-index): example.com/articles
NEW URL (if no relevant page): example.com/
Sometimes, there are old pages that are not relevant to the business anymore. These pages may not be migrated across to the new site, but their URLs still need to be redirected. Just redirect it to the most relevant page on the new site, or relevant index page.
------
Now that we are aware of the different redirect types, it's time to talk about how we will prepare our beautiful new site in Webflow.
Preparing Your Rebuild Project In Webflow
With the Webflow project created, and given what we know about link juice, we need to make sure that we rebuild all the high-value pages and set up 301-redirects before we connect the domain.
To find out what pages are driving the most traffic to the OLD SITE, we can use Google Search Console or a tool like Screaming Frog to find. If the OLD SITE has analytics tools, you can also check the reports.
The pages driving significant traffic must absolutely be rebuilt. The URL should be kept the same or as close to the OLD SITE URL as possible.
If there are hundreds of pages, migrating this content across can take some time. But it's critical that you do or else you will likely see a huge drop off in traffic to the site and lower conversion rates. You want to avoid this at all costs.
There are tools to help with migrating from different CMS to Webflow, however that is a topic for a standalone article. Here is one that shows how to Wordpress to Webflow.
Regardless of the CMS you are migrating from, the key thing is to make sure all the high value pages on the OLD SITE are rebuilt on the NEW SITE.
Note: You don't need to migrate low performing or non-relevant pages across, these will be handled with our redirect strategy.
Assuming you have all the key pages rebuilt, we can shift our focus to creating the redirect document.
How to Create 301-Redirects For Webflow
There are 2 ways to create 301-redirect documents. The old way which is very boring and time consuming. And the new way which is quick and easy, and created because of how painful the old way was for me.
The Old Way
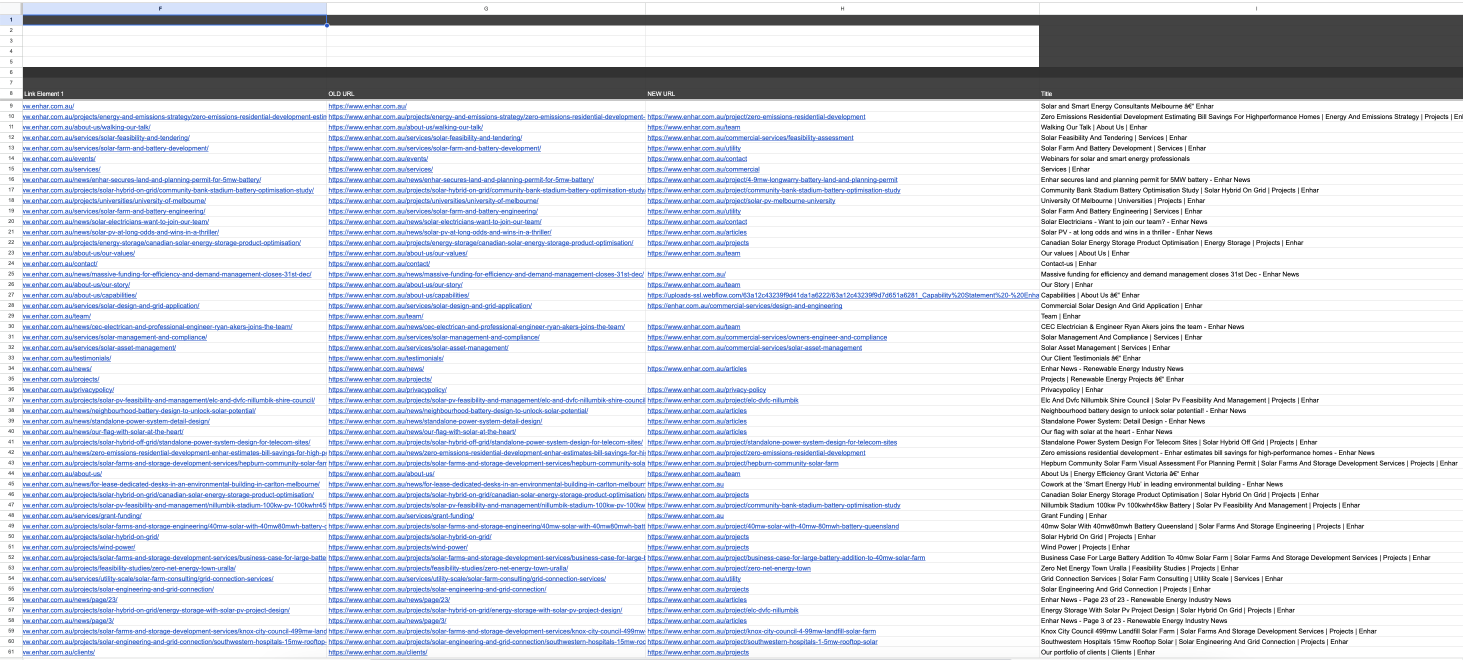
The old way to create 301 redirects was to get sitemaps from the OLD SITE and the NEW SITE and create a new migration spreadsheet. In that migration spreadsheets, you would have the OLD URL.
Below is an example of one I completed for an SEO company, which they turned into the 301-redirect CSV. Look fun, right?

This 350+ page site took 5 hours to do, manually matching up the most relevant URLs on the NEW SITE to the OLD SITE.
There were also some duplicates on the OLD site that needed to be removed. In some instances, I have seen staging sitemaps that were indeed themselves 404 error pages, which also have to manually removed.
The New Way
The new way is to use software to automate the time consuming part of the redirect process.
This software would get the sitemaps from the OLD URL and NEW URL, automatically match up the most relevant paths, let you edit them and download them as a .csv or .htaccess file.
Here's where you can input your URLs. Here's a video guide that shows you the workflow.
It would also let you upload csv's from tools like screaming frog, removing duplicates and making sure no redirects are pointing to a 404 page on the staging site.
If you have the sitemaps of your OLD SITE and NEW SITE, you can generate 301-redirect documents from them here.
This new workflow saves hours in spreadsheets manually matching up, by getting computers to do what computers do best, so you can focus on the other things like building a beautiful site.
After reviewing the URLs, you can export the 301-redirects as a .csv in preparation to upload them to Webflow.
Uploading 301-Redirects To Webflow
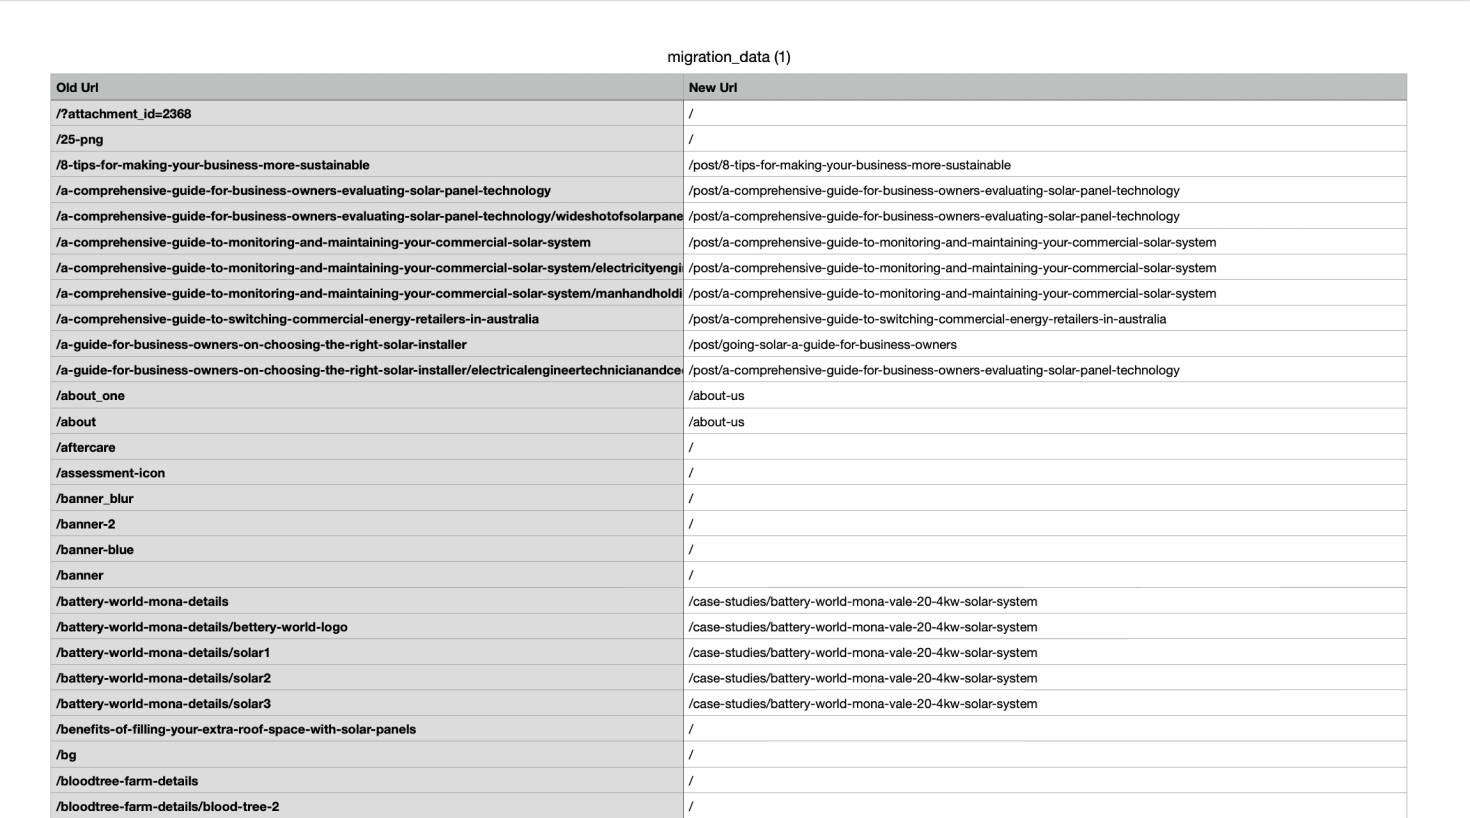
Your exported migration document will look something like the image in this section, with the OLD URL and the NEW URL side by side. This is what we will upload to Webflow.
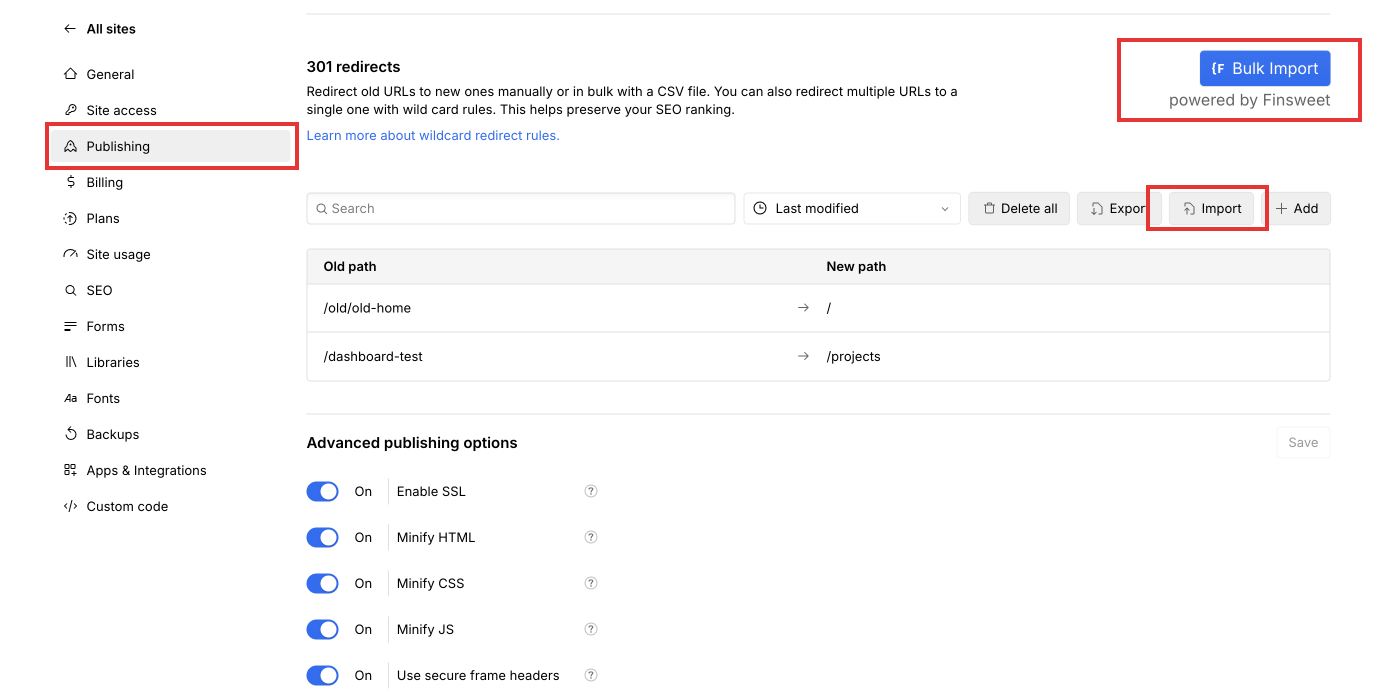
Here's how to do that: In Webflow, go to Project Settings -> Publishing and find the section that says 301 redirects. This is where we can import the CSV file we generated from Rapid301.

To upload 301-redirects you will need a site plan. We'll be launching straight after so best to grab it now.
With the siteplan added, we can upload our 301-redirects to Webflow in bulk. There are two options for this. Webflow's native bulk import feature or FinSweet's Bulk Import. I tend to because the latter because it's fantastic, but be aware that it has been deprecated.

Connect The Domain And Launch
Caution: Do not connect the domain until all the pages have been rebuilt and you have setup the redirects.
Now that 301-redirects have been uploaded, you can connect the domain. If you haven't done this before, Webflow has a great tutorial.
If you have, go ahead and connect the domain. This will point the domain (example.com) to the Webflow site. The next step is to go click on Settings -> SEO tab in Webflow and make sure it's properly configured.
Steps to ensure your Webflow site has correct SEO configuration:
- Turn On sitemap.xml is auto-generation
- Verify your site with Google Search Console.
- Add sitemap path (sitemap.xml) to Sitemaps in Google Search Console.
- Add the Global Canonical tag that matches your default domain.

Doing these things will help Google find your site and enable you to track if pages are properly being indexed and the redirects are working effectively.
You can also add analytics (Google or Plausible or equivalent).
Step 7: Post Migration Checks
Once the site is live and working on new domain, you can test to see if your redirects are working by navigating to the OLD URLs. If they redirect, success! Traffic will continue to flow.
The first 2 days after your site is live, be sure to keep an eye on Google Search Console and ensure things look as you expect them too.
You may see a slight change in clicks and impressions while the changes take effect so be sure to monitor closely.
If you notice anything looks really strange, put the fix it place as fast as possible.
Conclusion
The best strategy when it comes to setting up 301-redirects is to keep the URL structure the same, so you don't need to setup 301-redirects.
If you rebuild a website that has a large number of existing pages and URLs, you will need to make sure you have corresponding pages on the NEW SITE. And you will need to set up 301 redirects in Webflow to preserve backlinks, maintain domain authority.
You can do this manually and take a very long time, or you can leverage tools like Rapid301 can to speed up the workflow by 10x-100x
Once you've gone line with the new site make sure you submit the updated sitemap to Google Search Console so that Google can easily crawl your site.
And be sure to check the analytics and other statistics over the coming days to ensure the redirects have been set up successfully.
If you have questions or need further assistance, feel free to reach out!
