SEO Migration from WordPress to Webflow: A Step-by-Step Guide

Introduction
So your client is done with Wordpress and want's their new site built in Webflow. They have hundreds of pages on their old site, static, blogs, past projects and you feel like your job is cut out for you.
We're not going to lie, migrations like this require some work, but with the right plan, it can be much less painstaking.
In this guide, we’ll walk you through every step so that you (and your client) can get the new Webflow site launched in no time (and as painless as possible).
Here's a quick overview of the process:
- Get content from the Wordpress Site.
- Build the site in Webflow (static pages & CMS structure)
- Add content to the site (page content, meta information)
- Bulk import content into the Webflow CMS (if possible)
- Set up 301 redirects.
- Go Live
Before we get started, there are some key things to mention:
- Not all data will be easy to migrate across, with CMS images being the most tedious.
- SEO implications for these migrations are real. Strategies need to be in place to ensure domain authority and link juice are kept intact.
With that out the way, let's get this SEO migration from Wordpress to Webflow underway.
Step 1: Get Content from WordPress
Getting content from Wordpress may seem straightforward. Just export it right? Here's the catch.
It's not in the same format that you need for Webflow and due to different apps wired together driving different parts of the content, there isn't an easy uniform way to extract the data.
The TLDR: Consensus from the masterminds (Tim & Matt) is to use a tool like Octoparse to build a web scraper (no-code needed!) to get a clean output of your Wordpress site.

If you did want to use Wordpress Native Export, you could navigate to Tools -> Export -> Export All Content and get the XML file. Then you can parse that XML to CSV using a tool like ConvertCSV, but you'll see this approach is far from ideal.
Just stick with a tool like Octoparse and get started for free.
NOTE: There is no need to backup the Wordpress site, you will keep the server live until you move the domain to Webflow (update DNS records).

Step 2: Build The Site In Webflow
Now to the fun part, it's time to Webflow. Add some pages, configure the CMS and then off you go.
But wait a minute. The old site was built in Wordpress and we have all the power of the Webflow designer to build this new one.
This makes it a great time to:
- Improve the design, site structure & user experience.
- Improve / clean the content (make sure it copy is relevant to current business, remove old / outdated content)
TIP: Use Webflow's page builder to make a more beautiful and functional design.

But most importantly, you need to make sure that the pages driving the most traffic to the site are rebuilt.
There are 2 types of pages:
- STATIC pages (home, about)
- DYNAMIC pages that have a structure of the CMS (blogs, projects, team
With the Wordpress content in CSV format, you'll have a good idea of the page content and site structure you are dealing with and can plan which STATIC and DYNAMIC pages you will need.
Use Google Search Console or a tool like Screaming Frog to find the highest performing pages.
- Pages that have lots of clicks and impressions MUST be rebuilt.
- If impressions are much higher than clicks, consider updating the Page Title & Description.

It's best practice to keep the URL structure the same on the new Webflow site as the old Wordpress site. Keeping the same structure will ensure the minimum amount of disruption to traffic as the pages are already indexed (ie, Google knows they exist and does not need to find them)
However there will be times where it is not possible to keep the exact same URL. In this case, you will need to setup 301 redirects (don't worry, it's easy and we cover that later).
But for now, the critical point is build out the STATIC pages with the same URL if possible and configure the Webflow CMS with the fields that are required to add the content from your old Wordpress site.
Before moving on to the next step, ensure that all the internal links are connected.
Step 3: Add All Content To Webflow
With the STATIC and DYNAMIC pages built and CMS structure setup, it's time to migrate the content across.
But don't just copy and paste it across. Remember, this is a great time to update the design and improve the copy for the STATIC pages.
For the CMS driven content, like blogs, articles, projects, case studies etc, Webflow has a handy Bulk Import feature.
To use Webflow's Bulk Import feature, you will need to make sure the CSV files generated by Octoparse (or alternative) are in an appropriate structure.
The easiest way to do this is to update the headers at the top of the CSV.
Ensure that the data is correctly uploaded and mapped to the elements on the CMS pages.

Step 4: Gather 301 Redirects
Now that you have the all the pages on the website built and filled with content, it's time to make sure that all the links indexed from the current Wordpress site resolve.
If there are URLs on the old site that do not exist on the new site, you will need to setup 301 redirects. This is critical for maintaining your SEO rankings, page authority and backlinks and ensuring users never end up on the dreaded 404 page.

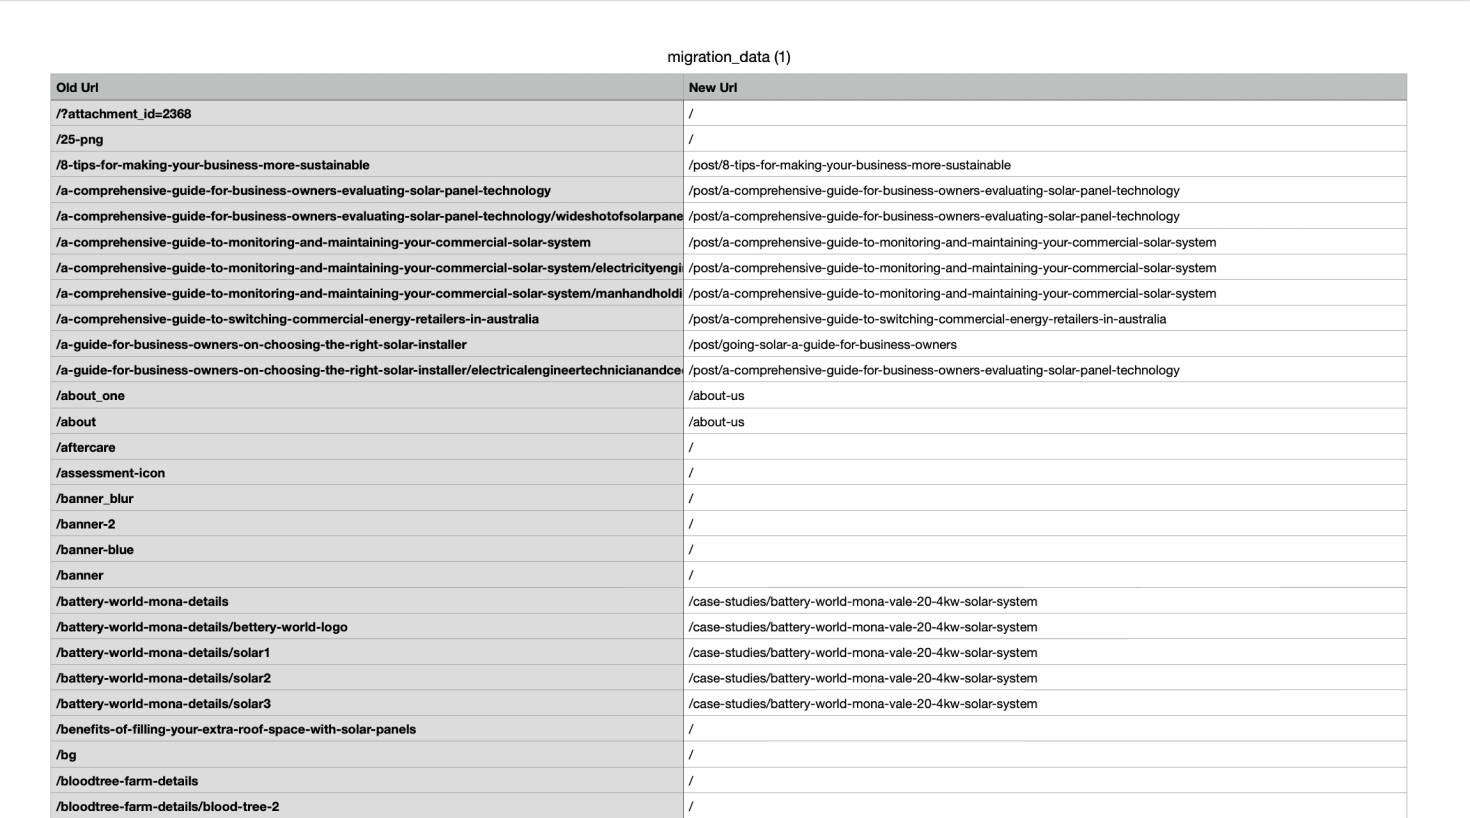
Thankfully Webflow has a bulk import feature and all you need is a .CSV file with all the Old Urls in one column and all the New Urls in another column.
If the Wordpress site has 100's or 1000's of pages, it might seem that you have a lot of work ahead to setup the 301 redirects for this SEO migration.
The fastest way to get a list of best matched 301 redirects for 100's or 1000's of pages is with a tool that automates the creation of CSV and htaccess files. I couldn't find one so I built Rapid301.
How to generate 301 redirects fast:
With your old Wordpress site still running (example.com) and your Webflow site with all the pages migrated to the staging domain (example.webflow.io), you can use Rapid301 to automatically create 301 redirect CSV file.
Rapid301 will scrape both sites and match up the paths up automatically. If you have kept the URL structure similar it should be 95% there. You can then review the redirects in the powerful table before exporting.
Once you are happy with the output, download the CSV with all the pages redirected to their best matched path.
With the CSV in hand you can proceed to Step 5 and upload the redirects.

Step 5: Bulk Upload 301 Redirects To Webflow
Now we need to tell the Webflow server how to handle requests that go to URLs on the old site, that don't exist on the new site.
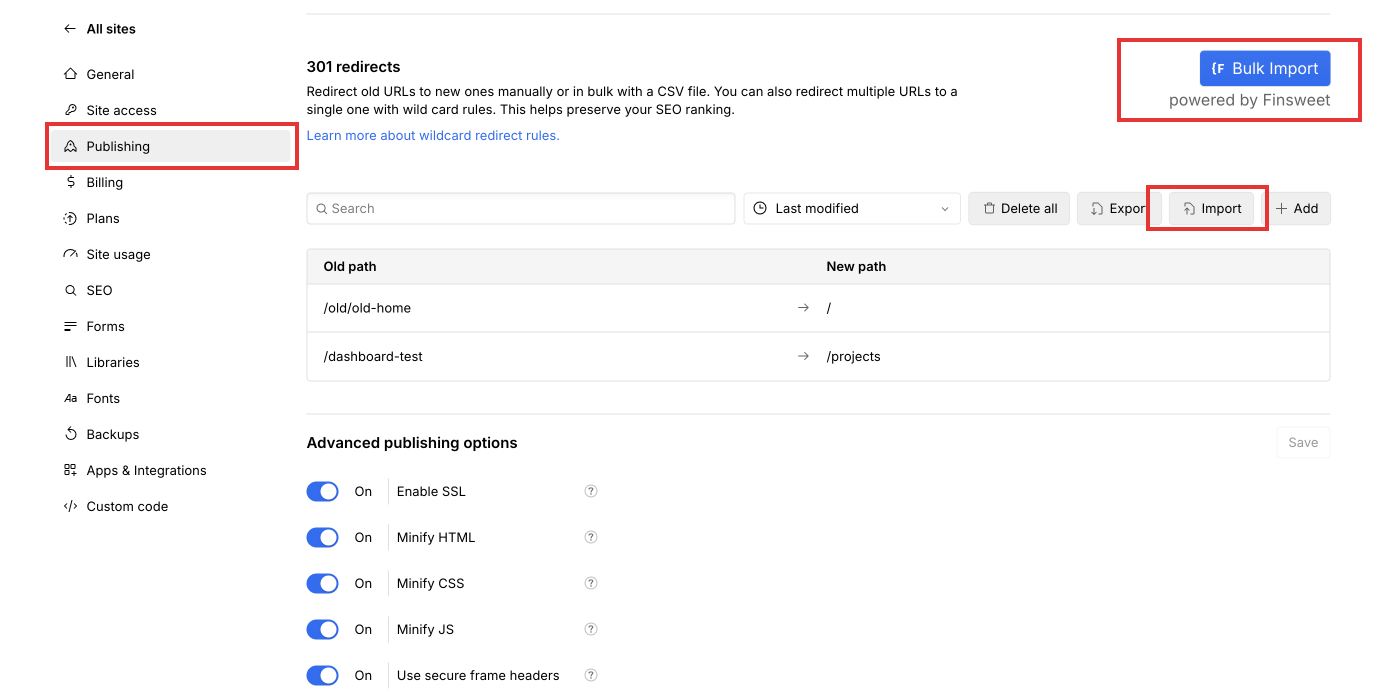
Here's how to do that: In Webflow, go to Project Settings -> Publishing and find the section that says 301 redirects. This is where we can import the CSV file we generated from Rapid301.
You will need a site plan to do this but we'll be launching straight after so best to grab it now. Once all the redirects are upload it's time to launch (provided you are happy with the site)!
Note: Webflow recently announced (2024) a bulk import feature. I also have FinSweet's tool installed because prior to Webflows update, they did not support it natively. FinSweets Bulk Import tool has since been deprecated.

Step 6: Connect The Domain And Launch
With the pages built, CMS configured and all the content migrated from Wordpress to Webflow, and the 301 redirects setup, it's time to connect the domain.
If you haven't done this before, Webflow has a great tutorial.
If you have, go ahead and connect the domain. This will point the domain (example.com) to the Webflow site and you and your client will be free from Wordpress!
The next step is to add go the Settings -> SEO tab in Webflow and make sure it's properly configured.
Steps to ensure your Webflow site has correct SEO configuration:
- Turn On sitemap.xml is auto-generation
- Verify your site with Google Search Console.
- Add sitemap path (sitemap.xml) to Sitemaps in Google Search Console.
- Add the Global Canonical tag that matches your default domain.

Doing these things will help Google find your site and enable you to track if pages are properly being indexed and the redirects are working effectively.
You can also add analytics (Google or Plausible or equivalent).
Step 7: Post Migration Checks
The first 2 days after your site is live, be sure to keep an eye on Google Search Console and ensure things look as you expect them too. Pages should be indexing. If key pages aren't properly indexed, it is critical that you find out why and put the fix it place as fast as possible.
You may see a slight change in clicks and impressions while the changes take effect so be sure to monitor closely.
Conclusion
Migrating a site from Wordpress to Webflow involves a few key steps. Getting the content off Wordpress, finding the key pages, rebuilding (and improving) the site design and content and setting up 301 redirects.
Using tools like Octoparse, Webflows Bulk Import features for the CMS and 301 redirects as well as Rapid301 can help speed up this process and get you like faster.
In order to minimise the negative SEO impact, it's import to make sure that all of key pages are identified and rebuilt, and if their URL has changed that a 301 redirect has been setup.
If you have any thoughts or questions or need help with a migration, please do not hesitate to contact us.
